
The Yota build
Page 1 of 1

The Yota build
![]() by MasterYota Wed Jan 15, 2014 4:25 am
by MasterYota Wed Jan 15, 2014 4:25 am
This is a copy of my build from the NCOAS site. I figured I'd move it over here for posterity... I may seem slightly disconnected as you read it, as it was copied post for post...
This truck was built in 2008...
For the longest time now, I've been wanting to explore a little further out than my usual stomping grounds. And as much
as I love my Propane injection, carrying extra fuel to go the distance is just not easy enough to do.
Enter Project AT&T, (there are two puns in the name)... It'll provide exceptional "long distance" performance, and
I suppose it could stand for "All Terrain Truck"... you could call it my "local and Long Distance carrier"...
(My lameness knows no limits... :smt081)
The truck is a '91 Toyota Regular Cab short box. The V6 and R150 5spd will be staying put, however the IFS will be getting the zip-cut treatment in favor of a SAS. Most of the drivetrain will be the proven units that have been underneath my 89extra cab for the last couple years. So this truck will inherit the crossover steering, and 4.88 gears, the rear spool and front lockright will also be making the trip over to the '91. The Marlin Crawler will be making the jump as well.
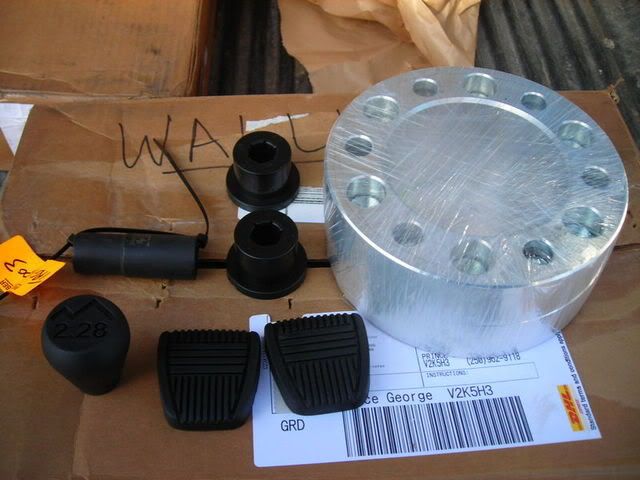
Here are pics of some of my new parts, and stay tuned for pics of the disassembly and build up...
A new HD Ceramic Clutch kit: better holding power, and less chance of failure from overspin.

My new AA tcase adapter so that I can mate my gear drive case's in place of the factory chain drive.

The new 23 spline tcase input gear to match up to the 23 spline output on the transmission (more splines equals more strength :smt003 )

Some Diff armor and a new pitman arm to make my crossover steering work with the factory box.

Stay tuned for more pics and tech...
This truck was built in 2008...
For the longest time now, I've been wanting to explore a little further out than my usual stomping grounds. And as much
as I love my Propane injection, carrying extra fuel to go the distance is just not easy enough to do.
Enter Project AT&T, (there are two puns in the name)... It'll provide exceptional "long distance" performance, and
I suppose it could stand for "All Terrain Truck"... you could call it my "local and Long Distance carrier"...
(My lameness knows no limits... :smt081)
The truck is a '91 Toyota Regular Cab short box. The V6 and R150 5spd will be staying put, however the IFS will be getting the zip-cut treatment in favor of a SAS. Most of the drivetrain will be the proven units that have been underneath my 89extra cab for the last couple years. So this truck will inherit the crossover steering, and 4.88 gears, the rear spool and front lockright will also be making the trip over to the '91. The Marlin Crawler will be making the jump as well.
Here are pics of some of my new parts, and stay tuned for pics of the disassembly and build up...
A new HD Ceramic Clutch kit: better holding power, and less chance of failure from overspin.
My new AA tcase adapter so that I can mate my gear drive case's in place of the factory chain drive.
The new 23 spline tcase input gear to match up to the 23 spline output on the transmission (more splines equals more strength :smt003 )
Some Diff armor and a new pitman arm to make my crossover steering work with the factory box.
Stay tuned for more pics and tech...
Last edited by MasterYota on Wed Jan 15, 2014 5:23 am; edited 1 time in total

MasterYota- Posts : 346
Join date : 2013-02-21
Age : 45
Location : Prince George -

Re: The Yota build
![]() by MasterYota Wed Jan 15, 2014 4:27 am
by MasterYota Wed Jan 15, 2014 4:27 am
All the new parts came from NSOR's Trail Gear division ( http://www.trail-gear.ca/default.cfm?fa=home ). I thought the pricing was really reasonable, sometimes better than US pricing. I did alot of shopping around before hand though. The only real cost left will be the modification of my driveshafts to fit the wheelbase of the new truck.
I'll purchase a few other items as the wallet allows, like a new passenger door (rusted out) and a patch panel for the rusty rear fenderwell. Most of the small pieces can be swapped from the other truck, (brakelines, drop brackets, and so on...)
I'm using SKY Offroad's SAS brackets (the nicest of any out there, and the cheapest) with an additional 2" of drop designed into the front spring hanger. I used the regular SKY bracket on the last truck, but didn't like how close the spring came to the pitman arm under full stuffage(no fault of the bracket). The extra 2" will give me the added margin for error if I plant the front really hard. Plus I'm only running 3" leaves in the front this time (they should ride better as I'm after more comfort with this truck, but they are thinner leaves, so it should flex better as well).
Last edited by MasterYota on Wed Jan 15, 2014 5:25 am; edited 1 time in total
MasterYota- Posts : 346
Join date : 2013-02-21
Age : 45
Location : Prince George -
Re: The Yota build
![]() by MasterYota Wed Jan 15, 2014 4:29 am
by MasterYota Wed Jan 15, 2014 4:29 am
I ordered this clutch from Trail Gear's website (NSOR is the Distributor) and I thought that is was going to be an Aisin/Seco brand. However when it got here, it turns out its a high performance BOSS clutch. I'm unfamiliar with the brand name, but I'm hoping that if Trail Gear sells it, its a reputable company with quality parts.
I guess I'll find out.

I used to run Dynapack Clutches in most of my trucks and never had a problem with them, although some people don't seem to like them for whatever reason. I never had any issues.
Here is a shot of the Front spring hanger from Sky offroad. I had them lower the front spring eye mounts 2". This should eliminate any chance of the pitman arm contacting the leaf spring under full stuffage. A side bonus is it should also eliminate the need for the degree shims that I currently run. The kit includes everything seen in the photo, plus a pair of steel templates used to accuratley mark the frame for drilling the holes for the shackle tubes. The four black "doughnuts" are spacers for the shackles, as the factory shackles are bent inward at the leaf spring mounts, the shackles with the kit don't bend, so a spacer is included to take up the additional width.

I started into the old truck lastnight by first scraping all the dirt off that was hiding around the area's where I was planning on working. Its amazing how much dirt can get packed onto the bottom of a rig. The 5" speaker gives an idea of how much is missed during a quick wash at the coin-op!

I guess I'll find out.
I used to run Dynapack Clutches in most of my trucks and never had a problem with them, although some people don't seem to like them for whatever reason. I never had any issues.
Here is a shot of the Front spring hanger from Sky offroad. I had them lower the front spring eye mounts 2". This should eliminate any chance of the pitman arm contacting the leaf spring under full stuffage. A side bonus is it should also eliminate the need for the degree shims that I currently run. The kit includes everything seen in the photo, plus a pair of steel templates used to accuratley mark the frame for drilling the holes for the shackle tubes. The four black "doughnuts" are spacers for the shackles, as the factory shackles are bent inward at the leaf spring mounts, the shackles with the kit don't bend, so a spacer is included to take up the additional width.
I started into the old truck lastnight by first scraping all the dirt off that was hiding around the area's where I was planning on working. Its amazing how much dirt can get packed onto the bottom of a rig. The 5" speaker gives an idea of how much is missed during a quick wash at the coin-op!
MasterYota- Posts : 346
Join date : 2013-02-21
Age : 45
Location : Prince George -
Re: The Yota build
![]() by MasterYota Wed Jan 15, 2014 4:31 am
by MasterYota Wed Jan 15, 2014 4:31 am
Ah, some progress, finally.... Got the steering, and diffs out of the extra cab and the tcases should come out tomorrow, followed by the temporary diffs going back under (should I really feel ambitious!) The extra cab should be out of the shop sometime next week, which means the 91 should roll in sometime next week as well.
Steering is gone, and the drive shafts have been removed

Ubolts shouldn't look like this, I must've overtightened it, causing it to bend the bolt, and the plate.

Axles are gone.

Removed the Dual case crossmember, we can see that the rear tcase ouput seal has been leaking.
The crossmember is from Big Country Customs, and is uber beefy.

Only a true craftsman/fabricator can come up with a crossmember like is... :smt003

The Dual cases are out, almost as difficult as when I put them in... :smt013

Here are a few shots of the tcase mounted parking brake from All Pro Offroad that will be going to the new truck as well.


The temp. diffs should go in tomorrow, or early next week, depending on how ambitious I get...
Steering is gone, and the drive shafts have been removed
Ubolts shouldn't look like this, I must've overtightened it, causing it to bend the bolt, and the plate.
Axles are gone.
Removed the Dual case crossmember, we can see that the rear tcase ouput seal has been leaking.
The crossmember is from Big Country Customs, and is uber beefy.
Only a true craftsman/fabricator can come up with a crossmember like is... :smt003
The Dual cases are out, almost as difficult as when I put them in... :smt013
Here are a few shots of the tcase mounted parking brake from All Pro Offroad that will be going to the new truck as well.
The temp. diffs should go in tomorrow, or early next week, depending on how ambitious I get...
MasterYota- Posts : 346
Join date : 2013-02-21
Age : 45
Location : Prince George -
Re: The Yota build
![]() by MasterYota Wed Jan 15, 2014 4:32 am
by MasterYota Wed Jan 15, 2014 4:32 am
Wow! I must be ambitious. I think I should sit down for a while until this feeling wears off!
Extra Cab is out! Does it ever look sad. And its only going to get worse before it gets better.

Here is a few shots of the 91 in the yard, just for some perspective, as well as a shot of it in the shop. Probably the last shot of it with anything resembling the stock suspension too. Just in case anyone is wondering, those are 33's on the truck, and its only got a 2.5" body lift. The rubber is on plain old white spokes so the backspacing makes the tires stick out a little more.


Here's a few shots of the vile rust monster that I'll have to deal with at some point. The door is pretty easy remedy - just buy one. The bed on the other hand is a different story. The wheel wells on both sides are gone, with the drivers side being the worst. Plus as I was poking around up there, I think some of the fender well itself is pooched behing the mud flap. Might have to go with something custom here, as I still want to haul my import camper once in a while. I'm thinking logger box style or something like that. Any suggestions?
The Drivers side of the box.

The bottom of the drivers door.

The rest of this truck is thankfully very solid, with a good frame and cab and front fenders and such. This truck will also have the rockrails installed before it hits the trail! (I know I've said that before, but this time I mean it!!!)
Extra Cab is out! Does it ever look sad. And its only going to get worse before it gets better.
Here is a few shots of the 91 in the yard, just for some perspective, as well as a shot of it in the shop. Probably the last shot of it with anything resembling the stock suspension too. Just in case anyone is wondering, those are 33's on the truck, and its only got a 2.5" body lift. The rubber is on plain old white spokes so the backspacing makes the tires stick out a little more.
Here's a few shots of the vile rust monster that I'll have to deal with at some point. The door is pretty easy remedy - just buy one. The bed on the other hand is a different story. The wheel wells on both sides are gone, with the drivers side being the worst. Plus as I was poking around up there, I think some of the fender well itself is pooched behing the mud flap. Might have to go with something custom here, as I still want to haul my import camper once in a while. I'm thinking logger box style or something like that. Any suggestions?
The Drivers side of the box.
The bottom of the drivers door.
The rest of this truck is thankfully very solid, with a good frame and cab and front fenders and such. This truck will also have the rockrails installed before it hits the trail! (I know I've said that before, but this time I mean it!!!)
MasterYota- Posts : 346
Join date : 2013-02-21
Age : 45
Location : Prince George -
Re: The Yota build
![]() by MasterYota Wed Jan 15, 2014 4:34 am
by MasterYota Wed Jan 15, 2014 4:34 am
Got more done today on the tear down. All I have to say is "Torsion bar mounts suck". Broke the bolt on both sides and bounced a 7/8ths wrench off my skull in the process. Oh well, I'm sure I'll survive.

After the torsion bars were slacked off, I started with the typical removal of the front suspension. Worked both break lines loose (without breaking them!) and didn't forget to remove the stupid clip that holds the rubber line on.

After that, managed to undo the the 3 bolts in the top of A arm mount and then undid the torsion bar from the arm. As usuall, I had to cut the nut off the top of the shock.

Once the bar is disconected the arm can be removed from its mount and wiggled out of the way.


Most of the brake a fuel lines on a toyota run down the passenger side frame rail, and a whole crap load of lines seem to occupy the torsion bar area. Removal of the torsion bar is complicated by the fact that some retarded engineer thought it would be a good idea to pass the torsion bar throught the middle of this crowded area. Needless to say, I broke the fuel line taking the bar out. But, its was fairly fragile to begin with, and had been repaired once before, so I guess that replacing the line wouldn't be a bad idea anyway. Same goes for the brake lines, as I'll be removing that goofy load proportioning valve from the rear of the truck, and its associated lines as well.
It was also like Xmas again today, as some more of my buildup parts showed up today.
A new set of TG rock rails, and gussets/mounts (they are so cheap its not worth building them) , 3" TG rear leaf springs (massive!) with bushings, 1.5" wheel spacers, some new pedal pads, tcase shifter knob, and a flip socket (gotta spend enough to get the free shipping!!!) :smt002


I'm hoping to have the rest of the differential and suspension/steering out in the next few days if all goes well. After that, its on to the fun stuff!
After the torsion bars were slacked off, I started with the typical removal of the front suspension. Worked both break lines loose (without breaking them!) and didn't forget to remove the stupid clip that holds the rubber line on.
After that, managed to undo the the 3 bolts in the top of A arm mount and then undid the torsion bar from the arm. As usuall, I had to cut the nut off the top of the shock.
Once the bar is disconected the arm can be removed from its mount and wiggled out of the way.
Most of the brake a fuel lines on a toyota run down the passenger side frame rail, and a whole crap load of lines seem to occupy the torsion bar area. Removal of the torsion bar is complicated by the fact that some retarded engineer thought it would be a good idea to pass the torsion bar throught the middle of this crowded area. Needless to say, I broke the fuel line taking the bar out. But, its was fairly fragile to begin with, and had been repaired once before, so I guess that replacing the line wouldn't be a bad idea anyway. Same goes for the brake lines, as I'll be removing that goofy load proportioning valve from the rear of the truck, and its associated lines as well.
It was also like Xmas again today, as some more of my buildup parts showed up today.
A new set of TG rock rails, and gussets/mounts (they are so cheap its not worth building them) , 3" TG rear leaf springs (massive!) with bushings, 1.5" wheel spacers, some new pedal pads, tcase shifter knob, and a flip socket (gotta spend enough to get the free shipping!!!) :smt002
I'm hoping to have the rest of the differential and suspension/steering out in the next few days if all goes well. After that, its on to the fun stuff!
MasterYota- Posts : 346
Join date : 2013-02-21
Age : 45
Location : Prince George -
Re: The Yota build
![]() by MasterYota Wed Jan 15, 2014 4:35 am
by MasterYota Wed Jan 15, 2014 4:35 am
Well, I rediscovered my love for power tools today, in specific, the sawzall :smt007 (it sure makes swift work of stuck bolts and other things!) The suspension is out and now the fun stuff can begin (yipee!)
Here are some more pics...
Apparently there is limit as to how far the suspension can travel before the cv is affected...

A newly aquired pile of junk on the floor. I will be keeping the hubs and rotors and calipers so don't bother asking about them. The rest will be off to the scrap bin!

After 300K plus kilometers its no wonder why the bolts wouldn't come out, so I chopped off the arms with the sawzall....Muahahahaha!!!

And here is the truck, just waiting for cool stuff to go on...

Let the fun begin!!!
Here are some more pics...
Apparently there is limit as to how far the suspension can travel before the cv is affected...
A newly aquired pile of junk on the floor. I will be keeping the hubs and rotors and calipers so don't bother asking about them. The rest will be off to the scrap bin!
After 300K plus kilometers its no wonder why the bolts wouldn't come out, so I chopped off the arms with the sawzall....Muahahahaha!!!
And here is the truck, just waiting for cool stuff to go on...
Let the fun begin!!!
MasterYota- Posts : 346
Join date : 2013-02-21
Age : 45
Location : Prince George -
Re: The Yota build
![]() by MasterYota Wed Jan 15, 2014 4:36 am
by MasterYota Wed Jan 15, 2014 4:36 am
Here the lower bracketry has been cleaned off the bottom of the frame. I probably won't remove all the bracketry as it won't interfere with anything anyway, and I don't feel like grinding all that crap off. The upper bumpstop will come off however, as that would look tacky. I'll probably mount the shock tower to the remanants of the front-most bracket (which was the orriginal shock mount).

After cleaning up the front crossmember, here is a shot of the new SKY offroad spring hanger. The bolts that mount the hanger can just be seen behind the front brace. The hanger can be mounted in a neutral position, 3/4" forward, or 1.5" forward using the provided holes and factory captured nuts in the frame. This setup is just too easy to use, as there is no measuring for alignment. It just bolts on, and then gets welded on when I'm happy. I chose to mount the hanger 3/4" forward at the moment.

Here is a shot of the mounting holes in the spring hanger...

Here is how the hanger looks when its bolted up.

Here is the mock-up of the front springs. Looks like the Shackle hanger tubes will mount inside the front body mount.
Oh yippee....

By my eyes best guess, the steering geometry shouldn't be too bad either... The springs are pretty close to where they will be once the shackles are installed.

Stay tuned...
After cleaning up the front crossmember, here is a shot of the new SKY offroad spring hanger. The bolts that mount the hanger can just be seen behind the front brace. The hanger can be mounted in a neutral position, 3/4" forward, or 1.5" forward using the provided holes and factory captured nuts in the frame. This setup is just too easy to use, as there is no measuring for alignment. It just bolts on, and then gets welded on when I'm happy. I chose to mount the hanger 3/4" forward at the moment.
Here is a shot of the mounting holes in the spring hanger...
Here is how the hanger looks when its bolted up.
Here is the mock-up of the front springs. Looks like the Shackle hanger tubes will mount inside the front body mount.
Oh yippee....
By my eyes best guess, the steering geometry shouldn't be too bad either... The springs are pretty close to where they will be once the shackles are installed.
Stay tuned...
MasterYota- Posts : 346
Join date : 2013-02-21
Age : 45
Location : Prince George -
Re: The Yota build
![]() by MasterYota Wed Jan 15, 2014 4:38 am
by MasterYota Wed Jan 15, 2014 4:38 am
Found a little ambition today and finished removing the 5spd and tcase. Got lucky and only broke one bolt too! Unfortuneatly that bolt provides 50% of the attachement for the clutch slave cylinder. Oh well, I'm sure it'll come out somehow... :smt011 At least I'm just about finished with the broken bolt stage :smt003
Got the shackle tube locations measured and the Pilot holes drilled. Next comes the holesaw!
Hole-sawed the frame today (no turning back now) cleaned up the holes and slid the frame tubes in. Then mocked up the springs so that I can get the spring width (distance apart) correct. I'll get 'em squared up tomorrow and start the welding process. Front diff could be in by the end of the week with uppper shock mounts being the final component... I'll post up some pics later.
A shot of the tranny and tcase out of the truck. I measured the length of the tranny and my crawler unit and added them up - installed it'll be about 48" from bellhousing to output flange. Leaves about 8" from the back of the cases to the front fuel tank crossemember :smt009 (gonna' be tight!)

Next up the old clutch came out - still looks decent, no real heat checking or score marks. The friction disk still has lots of meat on it. Had the flywheel resurfaced today at Northern Auto and Machine Shop.


While I was this deep, I orderd a new rear main seal as well. This one isn't leaking at the moment, but Murphy says I should do it anyway... :smt002
Here are a few shots of the frame hole pilots and then of them cut out. There is a brace on the inside of the frame rail, and it wasn't too bad to deal with. Broke about 20 percent of the teeth off my holesaw on the first hole, so that made doing the other 3 holes slightly more difficult! But managed to cut them too, just had to push a little harder :smt003
The outside of the passenger side framerail

The inside of the passenger side frame rail

Inside of the passenger frame rail. The outer frame rail has been removed already, the piece in the hole is the inner bracing.

This is the outside of the driverside rail. Some of the brace can be seen inside the hole. The shackle tubes went in with only some minimal file work after the holes were cut.

Springs and shackles are mocked up, but the tubes aren't welded yet.

To square up the spring packs and get them the right distance apart I decided to mock up the front diff, and being as the tires were still on the diff, I figured I'd get a look at how the truck would sit. I lowered the truck onto the diff, and did up the Ubolts and then crawled out from under the front, and promptly shat in my pants. I couldn't belive how badly I've screwed up this project. The end result is not what I wanted at all. I was hoping for a nice, reliable, blend in with the scenery, don't attract unwanted attention, 4x4. Instead I got the "creature that plays in the Black Lagoon"... (remeber - those are 36" tires on the truck... :smt012 )

Yes, there is 17 inches between the fender and the tire. According to the tape measure I could put 44's on the truck and actually articulate with them...

I do have to remember that there is no winch, tranny or tcases, but the engine is sitting on the springs. I figure that I've gained about 11" of lift, about double what I had planned. I guess I won't worry about packing the import camper, I'll never lift it high enough to get it in. The head lights are 52" to the middle of the bulb, and its 31" to the bottom of the front crossmember...
I don't know if I'm tall enough to get into this thing! Rosie is gonna' kill me...
Got the shackle tube locations measured and the Pilot holes drilled. Next comes the holesaw!
Hole-sawed the frame today (no turning back now) cleaned up the holes and slid the frame tubes in. Then mocked up the springs so that I can get the spring width (distance apart) correct. I'll get 'em squared up tomorrow and start the welding process. Front diff could be in by the end of the week with uppper shock mounts being the final component... I'll post up some pics later.
A shot of the tranny and tcase out of the truck. I measured the length of the tranny and my crawler unit and added them up - installed it'll be about 48" from bellhousing to output flange. Leaves about 8" from the back of the cases to the front fuel tank crossemember :smt009 (gonna' be tight!)
Next up the old clutch came out - still looks decent, no real heat checking or score marks. The friction disk still has lots of meat on it. Had the flywheel resurfaced today at Northern Auto and Machine Shop.
While I was this deep, I orderd a new rear main seal as well. This one isn't leaking at the moment, but Murphy says I should do it anyway... :smt002
Here are a few shots of the frame hole pilots and then of them cut out. There is a brace on the inside of the frame rail, and it wasn't too bad to deal with. Broke about 20 percent of the teeth off my holesaw on the first hole, so that made doing the other 3 holes slightly more difficult! But managed to cut them too, just had to push a little harder :smt003
The outside of the passenger side framerail
The inside of the passenger side frame rail
Inside of the passenger frame rail. The outer frame rail has been removed already, the piece in the hole is the inner bracing.
This is the outside of the driverside rail. Some of the brace can be seen inside the hole. The shackle tubes went in with only some minimal file work after the holes were cut.
Springs and shackles are mocked up, but the tubes aren't welded yet.
To square up the spring packs and get them the right distance apart I decided to mock up the front diff, and being as the tires were still on the diff, I figured I'd get a look at how the truck would sit. I lowered the truck onto the diff, and did up the Ubolts and then crawled out from under the front, and promptly shat in my pants. I couldn't belive how badly I've screwed up this project. The end result is not what I wanted at all. I was hoping for a nice, reliable, blend in with the scenery, don't attract unwanted attention, 4x4. Instead I got the "creature that plays in the Black Lagoon"... (remeber - those are 36" tires on the truck... :smt012 )
Yes, there is 17 inches between the fender and the tire. According to the tape measure I could put 44's on the truck and actually articulate with them...
I do have to remember that there is no winch, tranny or tcases, but the engine is sitting on the springs. I figure that I've gained about 11" of lift, about double what I had planned. I guess I won't worry about packing the import camper, I'll never lift it high enough to get it in. The head lights are 52" to the middle of the bulb, and its 31" to the bottom of the front crossmember...
I don't know if I'm tall enough to get into this thing! Rosie is gonna' kill me...
MasterYota- Posts : 346
Join date : 2013-02-21
Age : 45
Location : Prince George -
Re: The Yota build
![]() by MasterYota Wed Jan 15, 2014 4:41 am
by MasterYota Wed Jan 15, 2014 4:41 am
Removing the body lift has crossed my mind already... :smt012 We'll just have to see how it sits with the weight on it and the rear end brought up to speed. Hopefully the springs will settle a little
I guess on the bright side I won't need to buy a snorkel :smt003
I have a set of stock front leafs that I might toss in just to see how it would look. It really is way to tall to for what I had planned. I'm beginning to wonder if trail gear sent me the wrong springs...?
I also managed to bend up a new hard fuel line to replace the broken one and ripped out all the nasty brake lines going to the rear of the truck including that stupid load proportioning valve.
All this crap is gone (well, the lines on the frame rails anyway!)

And this valve

And this better demonstrates just how tall it really is when you consider that Rosie is 5 foot nothing.... and she's standing!

I guess on the bright side I won't need to buy a snorkel :smt003
I have a set of stock front leafs that I might toss in just to see how it would look. It really is way to tall to for what I had planned. I'm beginning to wonder if trail gear sent me the wrong springs...?
I also managed to bend up a new hard fuel line to replace the broken one and ripped out all the nasty brake lines going to the rear of the truck including that stupid load proportioning valve.
All this crap is gone (well, the lines on the frame rails anyway!)
And this valve
And this better demonstrates just how tall it really is when you consider that Rosie is 5 foot nothing.... and she's standing!
MasterYota- Posts : 346
Join date : 2013-02-21
Age : 45
Location : Prince George -
Re: The Yota build
![]() by MasterYota Wed Jan 15, 2014 4:44 am
by MasterYota Wed Jan 15, 2014 4:44 am
There isn't much to adjust suspension wise - I need a minimum of the 3" springs to provide enough clearance for the pitman arm at full stuff. I seriously considering taking the body lift out. I'll have to look at long and hard once all the drivetrain weight is back in and the rear is lifted to match. That should be about two weeks from now - give or take...
Got some plumbing done, new fuel line installed from the filter to the motor, some spiffy new OD green epoxy coated brake lines to connect the rear to the rest of the system, and re-installed the tranny and tcases with the new clutch. Should get around to building mounts for the crossmember this week. Then install the rear lift to see just how stupid I've made it...
It did appear to come down a little with the additional weight, but with the weight transfer of the truck sitting firmly on the rear suspension right now, I won't really know anything until the rear suspension is done.
Well, some good news. With a jackstand under the rear diff to make the truck sit level, and the magic of weight transfer, the front has come down almost two inches! And I still need to install the front bumper and winch. That being said, it should settle at least another inch, plus the removal of the body lift, and it should comedown almost 5 inches in total. If so, it won't be any taller that my extra cab was, and I can live with that.
Started on the rear suspension yesterday - didn't make much progress ufortunatley... Back at it today though, I can smell the snow melting!!
Got the rear suspension in today. :smt013 It would have been really nice if trail gear had posted on thier website that when the rear leaves are installed, the front spring hanger must be moved. These leaves are a little longer than the stockers I guess, considering the tire isn't even in the wheelwell and the shackles is bottomed out against the frame under compression.
As for the body lift hardware, I'll need to get some new hardware, as the bolts, even if they do come apart, would be too long. I ordered some new cab bushings the other day from Cheiftan as well as my rubber ones are shot...
MasterYota- Posts : 346
Join date : 2013-02-21
Age : 45
Location : Prince George -
Re: The Yota build
![]() by MasterYota Wed Jan 15, 2014 4:46 am
by MasterYota Wed Jan 15, 2014 4:46 am
Rear suspension is finished, plumbing is 90% finished with only a one brake line left to install and then bleed the system. The Body lift is out (from under the cab anyway) and the driveshafts have been resized and installed. I'll have the shifters re-installed this week and maybe a good start on the front bumper too.
The valve is gone, and new lines have been run all the way down the frame rail. Broke one line (RF) when removing the body lift, so I had to replace it as well from the "T" under the master all the way to the flex line. LF is the only line left to be installed.
Got the holes cut and shifters installed for the twin stick and the Crawler yesterday. Should have the interior back in by tomorrow. Body lift under the box should come out thursday or friday - with bumpers following this weekend perhaps...
Well, here are some pics of the build and as it sits now...
There is no real order to these pics, in regards to what happened when, these were just on the camera.
The trans adapter instructions make no mention of this hole in the tcase - but it does have to be filled with something. The orriginal sensor plug was too big to clear the bolt head, so I ended up using a tranny pan plug that I cut the head off and notched so that it could be installed with a screw driver.


There is also some minor clearancing of the tranny required for one of the adapter bolts. A flap wheel on a grinder makes quick work of aluminum.

A shot of the new wheel spacers.

The new output seal on the tcase. I also spot welded the Park Brake disc to the flange. With 3 different flange bolt patterns on the disc it was a real pain to install the rear driveshaft and align the disc to the right pattern at the same time. Now I don't have that problem anymore.


The rear suspension comming out to make way for the new stuff.

Moving diffs around on car dollies is just too simple, and easy too!

A bad angle, but it does show somewhat how far back the axle was in the wheel well after the new springs were installed, and the shackels bottomed out soon afterward.

Here is where the front spring hanger ended up moving to

Here is a shot with the rear suspension matching the front for lift. 3" rear springs, 4" blocks, 6" shackles.... No really - there is no lift in this truck... Thats what was needed to make it sit level...

A quick shot of the tranny crossmember mount

Some pics of the body mounts being replaced with new poly ones. As you might have guessed, the body lift didn't go back in.


My forest of Levers has been reinstalled along with some factory looking shifter boots to keep everything looking nice and clean


The front shock mounts are in

Reinstallation and mods to the winch bracketry and bumper

Hopefully I'll get the front bumper finished tomorrow, as well as the brake line installed. Then its time to remove the lift from under the box and think of a rear bumper and some rear shock mounts. Then, install a CB and think about going to play!!!
The valve is gone, and new lines have been run all the way down the frame rail. Broke one line (RF) when removing the body lift, so I had to replace it as well from the "T" under the master all the way to the flex line. LF is the only line left to be installed.
Got the holes cut and shifters installed for the twin stick and the Crawler yesterday. Should have the interior back in by tomorrow. Body lift under the box should come out thursday or friday - with bumpers following this weekend perhaps...
Well, here are some pics of the build and as it sits now...
There is no real order to these pics, in regards to what happened when, these were just on the camera.
The trans adapter instructions make no mention of this hole in the tcase - but it does have to be filled with something. The orriginal sensor plug was too big to clear the bolt head, so I ended up using a tranny pan plug that I cut the head off and notched so that it could be installed with a screw driver.
There is also some minor clearancing of the tranny required for one of the adapter bolts. A flap wheel on a grinder makes quick work of aluminum.
A shot of the new wheel spacers.
The new output seal on the tcase. I also spot welded the Park Brake disc to the flange. With 3 different flange bolt patterns on the disc it was a real pain to install the rear driveshaft and align the disc to the right pattern at the same time. Now I don't have that problem anymore.
The rear suspension comming out to make way for the new stuff.
Moving diffs around on car dollies is just too simple, and easy too!
A bad angle, but it does show somewhat how far back the axle was in the wheel well after the new springs were installed, and the shackels bottomed out soon afterward.
Here is where the front spring hanger ended up moving to
Here is a shot with the rear suspension matching the front for lift. 3" rear springs, 4" blocks, 6" shackles.... No really - there is no lift in this truck... Thats what was needed to make it sit level...
A quick shot of the tranny crossmember mount
Some pics of the body mounts being replaced with new poly ones. As you might have guessed, the body lift didn't go back in.
My forest of Levers has been reinstalled along with some factory looking shifter boots to keep everything looking nice and clean
The front shock mounts are in
Reinstallation and mods to the winch bracketry and bumper
Hopefully I'll get the front bumper finished tomorrow, as well as the brake line installed. Then its time to remove the lift from under the box and think of a rear bumper and some rear shock mounts. Then, install a CB and think about going to play!!!
MasterYota- Posts : 346
Join date : 2013-02-21
Age : 45
Location : Prince George -
Re: The Yota build
![]() by MasterYota Wed Jan 15, 2014 4:49 am
by MasterYota Wed Jan 15, 2014 4:49 am
I ended up taking one short leaf out of the front aswell, so that I could put a shim in to make my driveshaft angles happy. The leaf packs were thick enough that the shim would rotate the pinion up, but the tie rod on the highsteer would hit the spring packs. By removing the short leaf, I could install the shim with no interference.
It lives! It lives!!!...... :smt003
Should leave the shop on Wednesday.... If I did everything right, it shouldn't need to go back either. Although there is always something...
Who am I kidding? Of course it'll be back.... :smt017 :smt003
I've got to build new bumpers front and rear, and fab up new bed to replace the pathetic cancerous excuse thats on there. But that will happen after QCC, for now, I'll just concentrate on getting the shop cleaned up again, and maybe putting some time into the Old Guard... :smt003
Well, it left the shop, under its own power, and went right back in. Took it for a drive up the street, and everything worked great. Untill I hopped out in the drive way and discovered my blunder. Apparently the floor in the shop isn't quite as level as it used to be, (to be honest, I've never really noticed :smt017 ). That being accounted for, I can now understand how I ended up putting about 4" too much lift in the rear. (read: looks freakin' ridiculous!!!) But I can solve that by taking out the rear blocks. Looks like I've also got to move one spring perch about 1/2 inch rearward to make the shackle angles line up the way they are supposed to. Otherwise it looks like it'll be a good rig once I get it sitting right. I've got some pics of it in the driveway with a few reference points , so I'll post them up later.
Here are some maiden voyage pics...
The height at the front ended up almost where I wanted it (you'd think I planned it this way!?) :smt017 :smt003

This shot of the rear though better shows just how much I over compensted the rear lift. The truck had a rake to it in the shop, but it wasn't this bad (note to self - remember that floor is unlevel next time!)

Here is a side shot, the truck is pointed down hill, but the rake is rather obvious. The rear bumper is "middle of my chest" high...


So today, I'll get the blocks out, and hopefully get the perch moved into the right spot. And maybe try this all over again...
It lives! It lives!!!...... :smt003
Should leave the shop on Wednesday.... If I did everything right, it shouldn't need to go back either. Although there is always something...
Who am I kidding? Of course it'll be back.... :smt017 :smt003
I've got to build new bumpers front and rear, and fab up new bed to replace the pathetic cancerous excuse thats on there. But that will happen after QCC, for now, I'll just concentrate on getting the shop cleaned up again, and maybe putting some time into the Old Guard... :smt003
Well, it left the shop, under its own power, and went right back in. Took it for a drive up the street, and everything worked great. Untill I hopped out in the drive way and discovered my blunder. Apparently the floor in the shop isn't quite as level as it used to be, (to be honest, I've never really noticed :smt017 ). That being accounted for, I can now understand how I ended up putting about 4" too much lift in the rear. (read: looks freakin' ridiculous!!!) But I can solve that by taking out the rear blocks. Looks like I've also got to move one spring perch about 1/2 inch rearward to make the shackle angles line up the way they are supposed to. Otherwise it looks like it'll be a good rig once I get it sitting right. I've got some pics of it in the driveway with a few reference points , so I'll post them up later.
Here are some maiden voyage pics...
The height at the front ended up almost where I wanted it (you'd think I planned it this way!?) :smt017 :smt003
This shot of the rear though better shows just how much I over compensted the rear lift. The truck had a rake to it in the shop, but it wasn't this bad (note to self - remember that floor is unlevel next time!)
Here is a side shot, the truck is pointed down hill, but the rake is rather obvious. The rear bumper is "middle of my chest" high...
So today, I'll get the blocks out, and hopefully get the perch moved into the right spot. And maybe try this all over again...
MasterYota- Posts : 346
Join date : 2013-02-21
Age : 45
Location : Prince George -
Re: The Yota build
![]() by MasterYota Wed Jan 15, 2014 4:51 am
by MasterYota Wed Jan 15, 2014 4:51 am
It was retarded with the body lift. I popped out the rear block and relocated the spring hanger yesterday, then took it for drive. The suspension is really soft, almost rides like it did with the ifs, and has about the same amount of body roll to it as well. The power is almost the same as it was with the 33s, so its very liveable as well.
As for the tail lights, the pair of APCs where cheaper over ebay than one replacement lense from the wrecker...... Thats including shipping, brokerage, taxes everything... plus they came with bulbs, and the right connector to plug into my harness. couldnèt pass them up... Plus I feel like a tuner now...
The ride is much better - almost as good as the IFS... With the TG 3" springs at all 4 corners, it dosen't ride like a buck-board anymore.
Truck worked really well on its maiden voyage to the canyon - managed to destroy one wheelspacer, the cb antennae, and the rear bumper, but otherwise it came out like a champ! CV joint seems to "clunk" pretty bad as well, but otherwise - I'm impressed with it. I'm also happy with the mileage too - Drove down - wheeled all weeked - drove back - on just over 1 tank of fuel.
And it flexes like crazy! The TG springs rock!
MasterYota- Posts : 346
Join date : 2013-02-21
Age : 45
Location : Prince George -
Re: The Yota build
![]() by MasterYota Wed Jan 15, 2014 4:54 am
by MasterYota Wed Jan 15, 2014 4:54 am
These Upgrades took place in 2009
Ah...new parts rock! This is just a teaser, so no pics, but the yota is undergoing a facelift this spring... After my sheet-metal to ground incedents last year, something needed to happen to make it look halfway decent again. Sorry guys, no back-half frame up buggy buildups for this kid, nothing that extreme, just a couple of nice new fuctional upgrades to ensure that I can keep up on the trail, and keep Johhny Law off my ass...
well, the fully caged rear might be closer than you think, but not the way your thinking it... :smt003
I didn't even take any pics of the construction, somebody (who lives with me, but denies any wrong doing...) misplaced my camera...
Well, the truck should be out of hibernation within the next two weeks or so, and most of my projects for this year have been accomplished, aside from a few finishing details.
Fabbed up a whole new bed this winter, and skinned it in 1/8" UMHW. It won't dent, won't rust, and I shouldn't need to wash it either, as nothing sticks to that stuff. It is somewhat ignorant to work with though, and after 550 rivets, I don't want to touch it ever again! The majority of the box is fabbed from 1x1x.120 square tubing, with the main portion of the floor done in 1x2x.120. It figure its about as heavy as the stock box, so no weight gain there. The main floor is 3/4 plywood.

Hopefully it holds up as well as I think it will. I also designed two side opening dry boxes, one on each side, that run the full length of the bed, so now I don't have to fight gravity hauling my fat ass up into the box to get at my tools and recovery gear, I can do it all from the ground!
A bonus is that a canopy can still go on top, giving me covered camping space.

Even fabbed my door latches: Probably overkill, consdering the pivot is a 5/8" heim joint, but it does get the job done...

Second on the list was some new fenders, my old steel ones had taken quite a beating from the seemingly constant contact with the ground last year, so I got some new ones. These are courtesy of Corey at http://www.toyotafiberglass.com/ and are really nice pieces! The price was very good too, and where only a little bit more than jobber steel replacements.


Corey leaves the fenders a little rough around the edges, so that door lines and such can be finessed, plus the mold line needed to be cleaned up. Just a minute amount of spot putty was needed, plus a quick sand job to remove the mold release before painting.


Got a replacemnt door hung on the driverside too...


Now I've sworn for years that I would get my rock sliders installed before any damage happend to the rockers. Well, as usuall that didn't happen last year. At least now the damage won't increase, as I finally got around to mounting them!
Here is last years oooops...


Here is a few shots of the rails being setup...
The mounting plate

The plate and tube mount with gusset


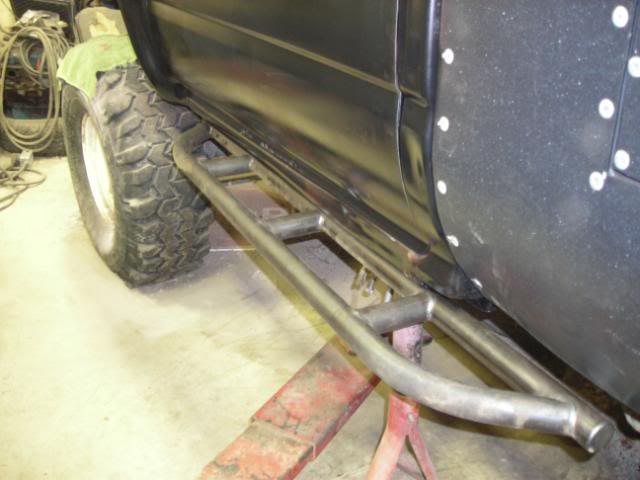
Three mounts per side. The Rails are from Trail Gear, and as usuall are very nice quality...
Now I know most of you are questioning the decision to go with fiberglass fenders, especially with the way I drive. So I figured some protection should be installed, so thats currently in the works.

I'll hopefully have these done within the week or so. I've a couple more projects planned but for now I'm keeping them quiet...
Ah...new parts rock! This is just a teaser, so no pics, but the yota is undergoing a facelift this spring... After my sheet-metal to ground incedents last year, something needed to happen to make it look halfway decent again. Sorry guys, no back-half frame up buggy buildups for this kid, nothing that extreme, just a couple of nice new fuctional upgrades to ensure that I can keep up on the trail, and keep Johhny Law off my ass...
well, the fully caged rear might be closer than you think, but not the way your thinking it... :smt003
I didn't even take any pics of the construction, somebody (who lives with me, but denies any wrong doing...) misplaced my camera...
Well, the truck should be out of hibernation within the next two weeks or so, and most of my projects for this year have been accomplished, aside from a few finishing details.
Fabbed up a whole new bed this winter, and skinned it in 1/8" UMHW. It won't dent, won't rust, and I shouldn't need to wash it either, as nothing sticks to that stuff. It is somewhat ignorant to work with though, and after 550 rivets, I don't want to touch it ever again! The majority of the box is fabbed from 1x1x.120 square tubing, with the main portion of the floor done in 1x2x.120. It figure its about as heavy as the stock box, so no weight gain there. The main floor is 3/4 plywood.
Hopefully it holds up as well as I think it will. I also designed two side opening dry boxes, one on each side, that run the full length of the bed, so now I don't have to fight gravity hauling my fat ass up into the box to get at my tools and recovery gear, I can do it all from the ground!
A bonus is that a canopy can still go on top, giving me covered camping space.
Even fabbed my door latches: Probably overkill, consdering the pivot is a 5/8" heim joint, but it does get the job done...
Second on the list was some new fenders, my old steel ones had taken quite a beating from the seemingly constant contact with the ground last year, so I got some new ones. These are courtesy of Corey at http://www.toyotafiberglass.com/ and are really nice pieces! The price was very good too, and where only a little bit more than jobber steel replacements.
Corey leaves the fenders a little rough around the edges, so that door lines and such can be finessed, plus the mold line needed to be cleaned up. Just a minute amount of spot putty was needed, plus a quick sand job to remove the mold release before painting.
Got a replacemnt door hung on the driverside too...
Now I've sworn for years that I would get my rock sliders installed before any damage happend to the rockers. Well, as usuall that didn't happen last year. At least now the damage won't increase, as I finally got around to mounting them!
Here is last years oooops...
Here is a few shots of the rails being setup...
The mounting plate
The plate and tube mount with gusset
Three mounts per side. The Rails are from Trail Gear, and as usuall are very nice quality...
Now I know most of you are questioning the decision to go with fiberglass fenders, especially with the way I drive. So I figured some protection should be installed, so thats currently in the works.
I'll hopefully have these done within the week or so. I've a couple more projects planned but for now I'm keeping them quiet...
Last edited by MasterYota on Wed Jan 15, 2014 5:37 am; edited 1 time in total
MasterYota- Posts : 346
Join date : 2013-02-21
Age : 45
Location : Prince George -
Re: The Yota build
![]() by MasterYota Wed Jan 15, 2014 4:56 am
by MasterYota Wed Jan 15, 2014 4:56 am
This is the end of the copied build thread - if I find any more pictures I'll post them up...
MasterYota- Posts : 346
Join date : 2013-02-21
Age : 45
Location : Prince George -
Page 1 of 1
Permissions in this forum:
You cannot reply to topics in this forum|
|
|